I realize now that in my earlier series of posts that covered the creation of my buildings, I didn’t do an over-reaching “this is the final product” summation. For those that are curious, my earlier posts were on:
And now this one, which will really conclude the series on my city terrain (well, at least until I get around to painting up the little gubbinz like lightposts and such). Sadly, I don’t have all that much to add that I haven’t covered in my earlier posts. I guess I could do another post altogether on marbling and on blood effects, since I did use quite a bit of each in these buildings, but I’ll refrain from that. If you’re interested in how I did either, you can find out more in the Dishonored Imperium post from January 2014 (which is worth looking into again if I do say so myself: I’m proud of how that model came out, and particularly so of the photos–which are far better than the actual product).
I wasn’t sure how I was going to do this, other than throw in a bunch of pictures of the finished buildings in, but now that I’m looking at them, this is clearly going to be way too long for one blog post, so I guess maybe this is the start of a mini-series on the completed buildings I’ve done. Anywho, I think I’ll go through each building and show the pictures of it, along with a little blurb about them. So, in no particularly order, here are:
The Doritos Factory:
 I decided just a moment ago that I needed to have a name for each of the buildings, but then right off the bat, I came up with a building that doesn’t have a definitive name. So, since I managed to sneak in a bag of Doritos in the rubble. It also was one of the four buildings I did with marble floors, but I’ll probably go over that on another building, so let’s skip that for now.
Other interesting tidbits on this particular building are that it has some plaster of paris cast bits (in the form of the three trunks). A friend of mine really got into casting models for a while, and when he gave up, he wound up giving me most of the molds to me. I really have done next to nothing with them, but there are some great molds there. I know one day I went ahead and was playing around with them and wound up casting a few little pieces with plaster of paris, and many of those wound up scattered around these buildings.


The Ammo Dump:
 Ok, I cheated and changed up the order a bit, but it serves a purpose. I wanted to show a little more of the output from those rubber molds, and this piece had a lot of them. Scattered around the base are ammo boxes and open crates of missiles. These are also plaster of paris. The two lines of crates/boxes in the corner of the board are actually some resin bits that I got from… well, I don’t rightfully recall. When my friend Marshall was getting out of 40k, he wound up giving me a small box of various gubbinz and these might have been included in there? I don’t know anything about them, but from the looks of them and the yellowish resin used, I wouldn’t be surprised if they were armorcast models from back in the day.
I wound up including some more marble on this piece, as well as a couple of pieces from the Forgeworld brass etch sheet for Ultramarines.

Rekall:
 I’m naming this building for the Total Recall reference in the poster, and it kind of has relevance in the fact that it also has an Ork campaign poster plastered to the door (I’m assuming that most Ork politicians are recalled at some point during their tenure).
As an added bonus? The post spells “Rekall” with an Orky twist. I could’ve have planned it better if I tried.
I also added some blood effects (not so successfully trying to include multiple levels, dripping down–an effect I think I achieved on another building and then tried to duplicate here). I think I’ll probably save that for the building that I achieved a better end result to talk about it.


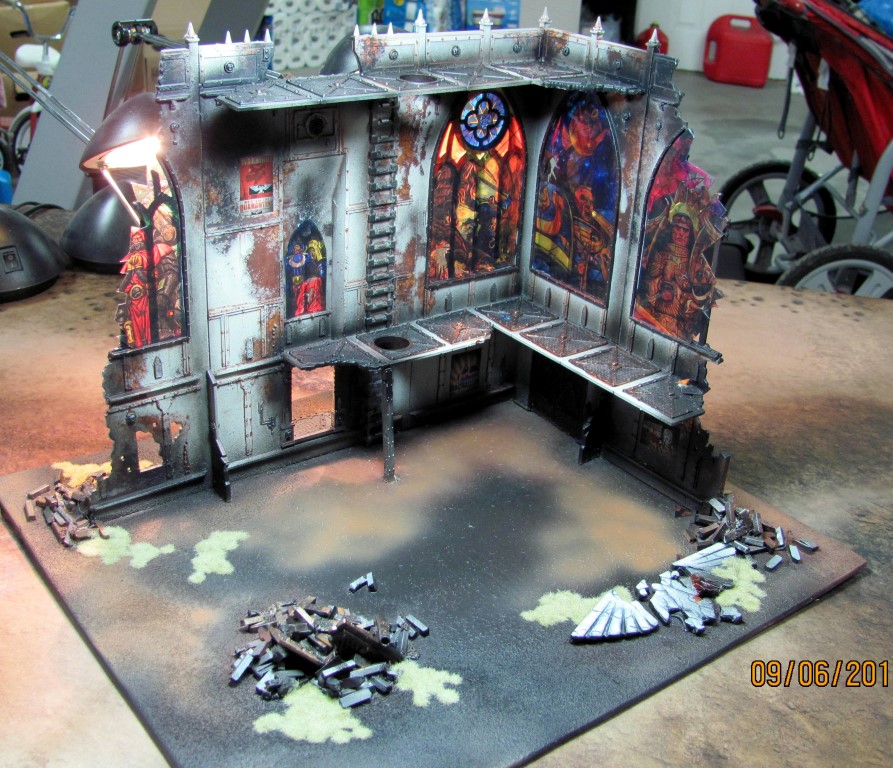
The Balcony:
 Ok, perhaps naming these is going to be harder than I thought. What would you call this building though? What sticks out in my head is that it’s an unusually long and skinny building, that it was one of only a couple that I had sprayed silver as a basecoat and that balcony at the front. That balcony really seems like a spot where an evil dictator spouts of inane rants to a crowd of mindless drones.
This one really seems to have a lot of posters in it. I’m not sure if it’s unusually high or not, but it seems like it from the photos. As for other interesting tidbits, there aren’t many. I did wind up shading each of the parts in the flooring. I know that the first building I did (see the “fuel depot” below), I wound up painting more detailed patterns onto the floor. After attempting a few random designs, I didn’t feel like it added enough to the model to justify spending all of that time on all of those squares, so I eventually gave up. Interestingly enough, I don’t think I really did much in the way of shading any of the other buildings’ floors–certainly not to this extent. I’m not sure why this one warranted such special attention…


The Big “L”
 Wow, that’s two lame names in a row. And that’s really a travesty, because I think this is one of the cooler buildings I own. Interesting footnote on this one: it really is one of the main reasons why I didn’t buy the city map from frontline gaming. It really looked great, but it was immediately clear that I wasn’t going to be able to fit several (if not most) of my existing buildings within the confines of that map without overlapping streets.
I think this building is close to two feet long. Maybe, in hindsight, it should’ve been two separate buildings, but when we were assembling them I was winding up with too many plain/square buildings and I wanted to mix it up. I also like that it’s big enough that you can have an actually battle fully contained within the confines of the building.
 So let’s talk a little about marbling. It’s an effect that I’ve used to some success in the past, and the only floors that come with the Pegasus hobbies building kits are these large dilapidated floors that are cut into tile squares. The natural inclination for me us to paint these up as marble (especially since I already have a technique for it). I could’ve just made them a single solid color, but I opted to alternate between black and white to make it stand out a little more. On some of the buildings, I even threw in some green tiles, but those were mostly painted over because it just didn’t have the same contrast/effect that black/white did. I even took the time to vary the direction of the striations between the black and white tiles by 90 degrees.
When it was all done, I wound up going over them with a gloss paint, per usual, and in this particular building I also hit the marble with a little OSL effect. I s’pose I should’ve gone back and glossed that over too…
I also included a few blood drops on this building, and was particularly happy with the little bit of blood leaking out of the window on the second floor and dribbling down to the ground below. I tried to emulate that on other buildings, but it didn’t turn out as nice. I think what worked on this particular instance was that it was subtle.


So, we’ll call that a stopping point for now. It looks like this will probably stretch into about three total posts when all is said and done. It almost seems like I’m stretching it out, but then again, I wound up working on these silently for about 3 months behind the scenes, so I’m probably allowed to stretch it into at least a few blog posts, right?


 I had made quite an extensive series of posts on buildings over the last few months. They covered everything from purchasing, to assembly, to painting, and more. Without a doubt, the most frequent question/comment I get was when was I going to take a picture of all of the buildings on one table?
 Honestly, I thought I was done with the whole series, but I’ve gotten so many people asking (read: upwards of two, but that’s huge on this blog), that I thought I’d cave to the hysterical masses and follow through with one of their requests. So, I wound up accomplishing just what they asked: put all of the buildings on the table and take a picture.
 Dammit, no, I didn’t. I just realized that I did put the rusted out building on the table.
 Anywho, throughout this post are thumbnails of the table as it was setup before that game. I tried to take pictures from basically every possible angle to get you whatever view it was you wanted. I’m a little sad that we used the grass mat, and not the dirty one, as it seems to be the better choice for playing with buildings.
 Oh well. Hopefully this helps to show people the general look and feel of the terrain and get an idea of the total size of all of the buildings combined. As always, please feel free to click on any of the thumbnails to view larger pictures.
 By the way, since I’ve written so many posts on the subject, I took the liberty to go back and make a tag for Building Progress. You can click on that link to go back and see all of the posts covering every stage of the process.