

 I’ve been working on this bastion for a while now, which is surprising because I was originally going to be happy with just painting it as in and it’s sort of spiraled out of control from there. First I wound up pulling it apart, covering it in tentacles, and doing up some ridge plates, but none of that seemed like enough.
We ended up with me putting on the hatches and thinking that they looked woefully out of place. Sure, they seemed to fit the style of the Tyranid army, but they just didn’t blend in with the rest of the model. My answer was to just cover the model in little bits of green stuff shaped into pseudo-organic blobs.
 I got to work on this, putting on clumps of green stuff and then going to town with my new set of sculpting tools (I haven’t done a blog post on them for some reason though…). In general, the bulk of the green stuffing involved two tools: one that let me push little creases into the green stuff and another that is just a ball on a stick which let me make little holes (hint: if you try this at home, I strongly advise you wet the tool so it doesn’t stick to the green stuff).
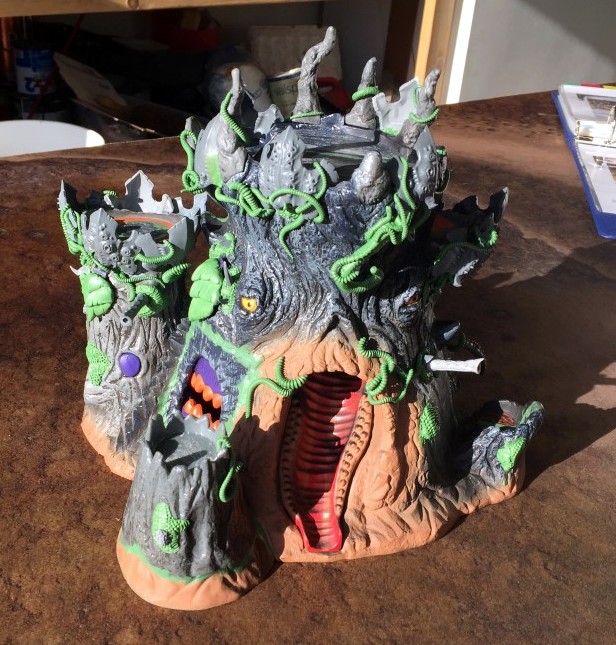
Those little blobs did their fair share to make the whole thing look a little more bug-like, especially around the top of each of the hatches, but they still didn’t do it for me. That is, until I reached into my bag of gubbinz and started mashing various little Tyranid bits into the green stuff.  I wound up using the various adrenaline and toxin sacs throughout, but the real star to me is the areas where I was able to work in some of the miscellaneous spikes and carapace pieces leftover from the larger Tyranid creatures.
In order to allow the hatches to open, I had to leave access to the hinges basically unfettered. For the life of me, I’m not sure why I’m still insisting that the hinges still work on the finished piece (And I’m not sure if they will still work after they get all of the build-up of stain from the dipping process). I did consider building up a ridge of green stuff over the top of it so that it hides the hinge completely, but in order to do so, and to allow the hinge to open fully, you really have to build it up rather thick and I thought that detracted from the style.
Otherwise, that’s about it. I did use some extra parts of green stuff to try to plug up some of the holes/gaps from the various carnifex carapaces as well.
Oh, I also wound up magnetizing the guns. For them, I wound up using some of the leftover bits I had from the various Tyranid sprues laying around. I believe these are barbed strangler bits from a Tyranid Warrior kit that I cut down, drilled out, and magnetized. I tried to place them–generally speaking–so that they were facing each of the cardinal directions, but also so that they were in somewhat natural looking positions. I wound up magnetizing them not because they should be removable (you can’t remove the heavy bolters from a standard bastion), but because they stick out precariously and I was worried that they may break off in time.
For each gun, I sculpted a bit of green stuff around the base to cover up the magnets, but I also included a little spot for an eyeball (which is how they address automated firing of the weapon).
Now, all that awaits is for me to paint the damn thing. Think I’ll get it done before the end of the year? God, I hope so…
By the way, the thumbnails below were taken in direct sunlight, which is never a good way to take photos of models; feel free to click on them for larger images.


Part of me really wants one of these now. It’s coming along great.
Well, you’re the inspiration! Personally, I think yours probably looks better, but this seems to have taken considerably less effort, so I’m happy with it. 🙂
On Tue, Jun 14, 2016 at 2:29 AM, Warhammer 39,9999 wrote:
>
It really looks great. All the little touches just pull it together into one cool looking piece. Projects like this have a tendency to just keep going. It’s just the nature of being creative I guess.
Thanks. I don’t really get into this sort of project very often–at least not in the hobby world–or that I put on my blog. But I am quite pleased with how it’s shaping up. Glad you like it too!
On Tue, Jun 14, 2016 at 2:30 AM, Warhammer 39,9999 wrote:
>
Best bastion of all time. It is just awesome. Going to flip out when primer hits it!
Lol. I’m sure it’s nowhere near the best of all time, but I appreciate the compliment none-the-less. It’s been primed now, and it does look a little more cohesive overall. I got distracted before I got to painting it though…
On Tue, Jun 14, 2016 at 3:12 AM, Warhammer 39,9999 wrote:
>
Well that looks grim, wonderful but nasty. Exactly like how it should be. Bravo.
Thanks!
Amazing work on it! Now stop fiddlin’ and get some paint on it so we can all drool 🙂
Sadly, it took a back seat to some Ultramarines that I intend to play at an Apoc game next month. Soon though!
On Tue, Jun 14, 2016 at 1:17 PM, Warhammer 39,9999 wrote:
>
Really looking forward to seeing this painted up. Hive Guard will look good having a tea party on top.
The Hive guard are just as happy on the bottom–seeing as they don’t need Line of Sight.
Actually, as far as rules go, I don’t think this is very good for bugs. We don’t really have any long range shooting units available, and the few that fit the mold wouldn’t really fit on top (I’m looking at you, Tyrannofex…)
On Sat, Jun 18, 2016 at 7:05 PM, Warhammer 39,9999 wrote:
>